Hello Again!
After such a long and tough third quarter of my second semester, I finally have time to start blogging again! And of course what better way to celebrate than to continue my well-received how to do calligraphy series! This is super exciting to write about again, and I have 4 letters to share with you today! So get some paper and your makers and let's get started!If you are interested in seeing what materials I use and recommend, then please take a look at this post.
Letters G - J
To keep this tutorial easy to follow, I will describe the needed strokes with a corresponding visual step-by-step. If you would like to see how to do the previous letters of the alphabet, click here and here.
The letter "g" is the first letter we learn about that is able to be flourished. Flourishing is the addition of embellishment and ornamental lines to writing. To write the letter "g" follow these steps:
- small curved downstroke
- thin curved upstroke
- long downstroke
- large thin upstroke
- flourish stroke 4 (optional)
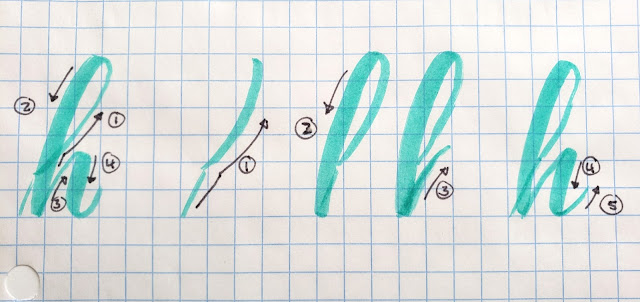
The "h" is fairly simple, as it is just a combination of previously learned strokes:
- Long upstroke
- Long downstroke
- Thin upstroke
- Short downstroke
- Tiny upstroke (optional)
"i" is the easiest letter to learn when practicing calligraphy, lets take a look:
- Small, thin upstroke
- Short downstroke
- Dot the "i"
See, just three simple steps, and you can make that too if you decide to not dot your "i"!
Now the letter "j" is a little more complicated. I am aware that there is a lot going on in the visual, but don't get intimidated, just think of it like a really long "i":
- Small. thin upstroke
- Long "hooked" downstroke
- Long, thin upstroke
- Dot the "j"
And that's it! You just learned four more letters of the alphabet! If they don't turn out perfect or exactly like the visual on the first or second try, don't be alarmed, and definitely don't give up. Just keep practicing. Practice makes progress, and you've got this!
Until next time, keep practicing and Stay Sweet!


Comments
Post a Comment